How to connect to a MySQL database using SSH Tunnelling


For this guide, you will need SSH to be enabled. Click here for a guide on doing that.

Windows Guide
There are many programs available for creating an SSH tunnel. We will be using Bitvise Tunnelier, which you can download and install here: http://www.bitvise.com/tunnelier-download

Once you have downloaded and installed Tunnelier, you will need to configure it.

How to configure Tunnelier:

  1. Under the Login tab, enter in the following information --
    1. Server Host: Your Domain Name
    2. Username: The cPanel username for your account
    3. Password: The cPanel password for that account
  2. Change the Initial Method to "password"
  3. Tick the box for Store encrypted password in profile

    7fec39933074737a562ab89b98a6159d536ca160?t=d448a1490b62ac5a0a816bf0dc828a47
  4. Under the Options tab untick Open Terminal and Open SFTP

  5. Under the C2S Fwding tab you will need to add some details about the connection forwarding.
    Click the Add button and enter these details:
    enabled 127.0.0.1 3306 DomainName 3306 MySQL

    434966da5719082c359e854a24efa81b1c1fc0ac?t=1cacec6592327a92d4b167bcabaa47d9

    However, if for some reason you are running a MySQL server on your PC (you are probably not), then change "List. Port" to 3308 for example
  6. You are now ready to connect to your Web Hosting Account using the SSH tunnel.
    Click the Login button on the bottom left-hand side of the program.
  7. Click the Accept and Save button when the Host Key Verification window when it pops up

sshtunnelier5.png
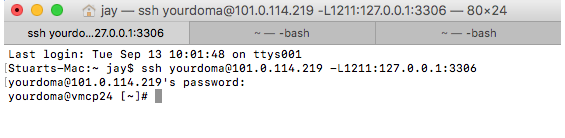
You will now be able to see the results of your connection attempt in the Log window. After the connection has been established, load whichever program that you are using to access your databases and configure it to connect to localhost (or 127.0.0.1) on port 3306 (or port 3308 if you set it to that instead).

sshtunnelier6.pngClick the Logout button to close the connection.


Mac Guide
Step 1 - Open the Terminal application from Go > > Applications > Utilities.

mac1.png

Click on Terminal.

c4885bbae28e6a335ebb5c38f6bc59361e82563e?t=e687cd6f550e4ceec5e40f8db775f76e

Step 2 - In the Terminal, run the following command: ssh cpanelusername@hostip -Llocalport:127.0.0.1:3306

Cpanelusername your cpanel account username
hostip the IP address off your server
localport a random port number (1211 is safe as it’s not a standard port)

mac3.png

Your SSH Tunnel should now be working. After the connection has been established, load whichever program that you are using to access your databases and configure it to connect to localhost (or 127.0.0.1) on port 3306.


Did you find this article useful?