How to Connect your Domain to Shopify
Note: This information is provided as a general guide, but we can't support any issues that may arise when using Shopify's portal. Shopify's own guide on the subject can be found
here.
This guide is only valid if you're managing your DNS with us. You can confirm this by checking your Nameservers using a
WhoIs lookup on your domain.
Our Nameservers can be found by viewing this guide. If you're not using our nameservers, you'll need to contact your registrar/nameserver provider for instructions on editing DNS records.
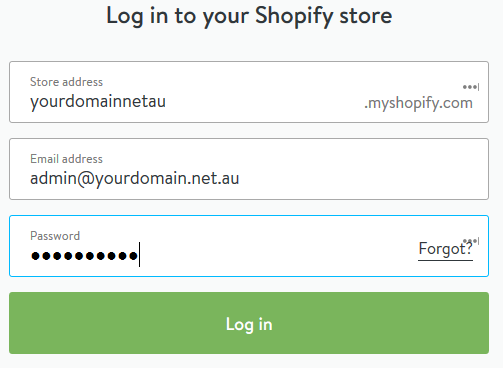
Step 1 - Go to shopify.com and click
Log in in the top right.

Add your login details and click
Log in.
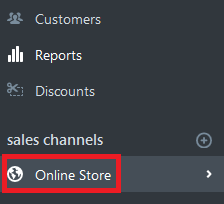
 Step 2 -
 Click on
Online Store.
 Step 3 -
 Click on
Domains.
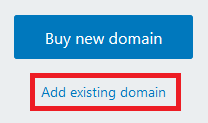
 Step 4 -
 Click
Add existing domain.
 Step 5 -
 Type in your domain name and click
Add Domain.
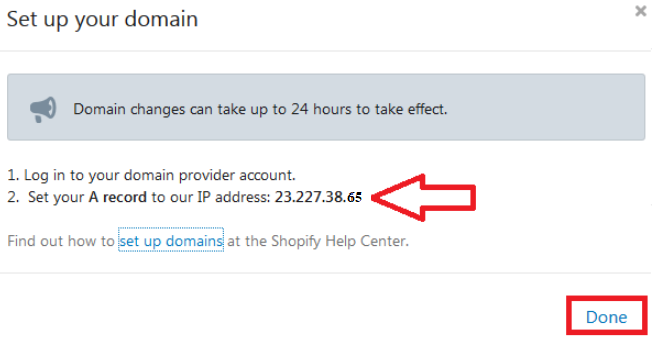
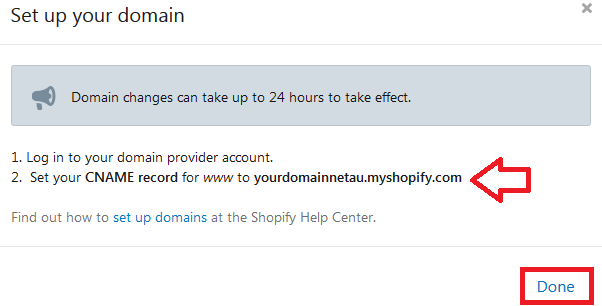
 Step 6 -
 You'll be provided with DNS records to add on our end. Take note of the
A Record and hit
Done.
 Step 7 -
 Now go back and click
Complete Setup next to the 'www.' record.
 Step 8
 - Take note of the CNAME record requested from Shopify (if you are not sure, use
shops.myshopify.com).
Step 9 - If your Nameservers are pointing to 'ns1.aussiedns.net.au',
follow this guide to add the required records in your Client Area, then skip to
Step 13. Otherwise, read on to learn how to add the DNS records in cPanel.
Step 10 - Keep the Shopify window open,
log into cPanel in a new tab, and click on the
Zone Editor.
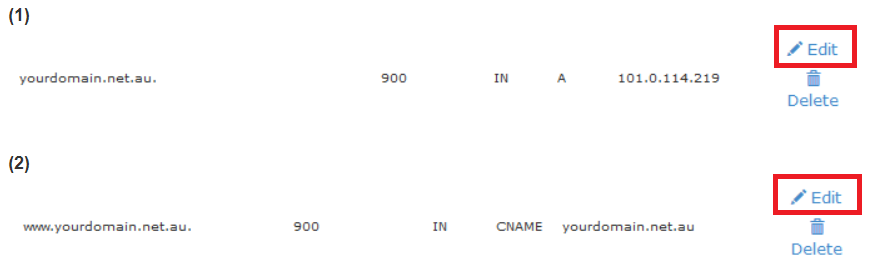
 Step 11 -
 Click on
Manage.
 Step 12 -
 Find and
edit these two records. Replace them with the A Record and CNAME (www.) records noted in the Shopify window. Hit
Save next to each record when done.
 Step 13 (Optional) -
 If you plan to send emails from your Shopify store, you will need to add Shopify's authentication records. Use
this guide to add the server
shops.shopify.com to the include list. Shopify also has a guide on this subject, which you can find
here.
After this has been done, your SPF record should look similar to:
"v=spf1 a mx include:shops.shopify.com include:spf.mailcluster.com.au ~all"
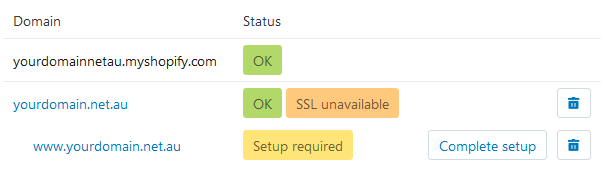
Step 14 - Go back to the Shopify window. You'll know when a record has propagated when you see a green OK next to it. Once both records say OK, your domain will be pointing correctly to Spotify. You can hit f5 on your keyboard to refresh the page. Note that records normally take between 15min to 4hrs to propagate, but in rare circumstances can take up to 24hrs.
If you need more help with your Shopify site please visit
https://support.shopify.com.
For more tutorials on website development and Content Management System troubleshooting, view our List of CMS Guides.


