How to Register Private / White Label Name Servers
Whitelabel Nameservers are a way to mask our default Nameservers with your own brand. Private Nameservers, on the other hand, allow you to create your own DNS zone on your VPS or Dedicated server.
Setting up your own private Nameservers on a cPanel server has many benefits, most importantly enabling all of cPanel’s built in DNS tools which can make DNS changes much easier. This guide will show you how to set up and register new private Nameservers on a cPanel server using the WHM (Web Host Manager) interface.
Before you start: Choose which domain you would like to use for the Nameservers. For example, if your primary domain is yourdomain.net.au you could use ns1.yourdomain.net.au and ns2.yourdomain.net.au.
Set up White Label Nameservers on Reseller Hosting
This guide will allow you to use the Zone Editor in your reseller account with Nameservers that you specify, as well as with our default reseller Nameservers.
Step 1 - Log into WHM, then find and click on the Basic WebHost Manager Setup option.
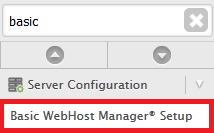
Step 2 - Scroll down to the Nameservers section. Add the Nameservers you want to create (minimum of 2) then click Save Changes.
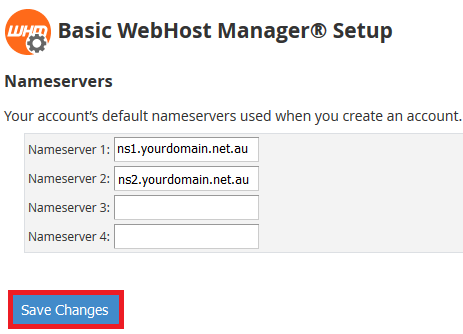
Step 3 - Contact your domain registrar and set up the following host / glue records. If the domain is registered with us, follow this guide. This only has to be done for the domain that you're using to create the Nameservers. In our example, this would be "yourdomain.net.au".
ns1.yourdomain.net.au - 101.0.101.106
ns2.yourdomain.net.au - 173.255.220.56

Note: These IPs are the A records of the default Reseller Nameservers 'ns1.auserver.com.au' and 'ns2.auserver.com.au'. If you have different default Nameservers, you will need to use a DNS tool to find the A record of these Nameservers instead. You will then need to use these IPs in the above step.
Once the Glue records are created, they can take between 4hrs and 24hrs to fully propagate globally. Once those records have propagated, you can start using these Nameservers with your clients' hosting. We have a guide on changing Nameservers here.
Set up Private Nameservers in WHM VPS [Unmanaged] & Dedicated Servers
Step 1 - Log into WHM, then find and click on the Basic WebHost Manager Setup option.

Step 2 - Scroll down to the Nameservers section. Add the Nameservers you want to create (set at least 2) then click Configure Address Record.
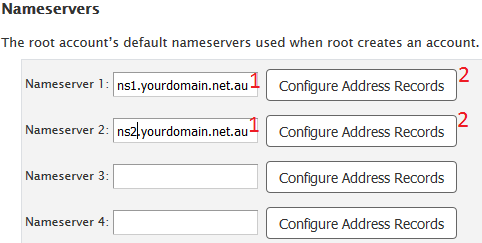
Step 3 - Enter the IP address of your server and click Configure Address Records.
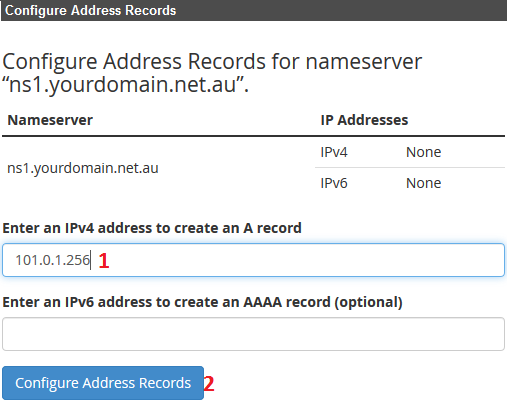
Note: If you have 2 Nameservers, it's fine for both of them to point to the primary IP of your server. Once you have configured the Address Records for both Nameservers, click Save Changes down the bottom
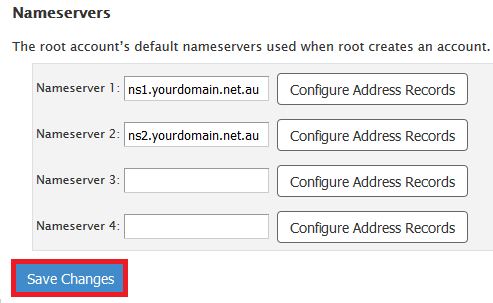
Step 4 - Log into the DNS management area for "yourdomain.net.au". Create A records as below, replacing "yourdomain.net.au" with your domain. You can find a guide on adding A records here.
Note: If you later change the Nameservers of "yourdomain.net.au" to "ns1.yourdomain.net.au" and "ns2.yourdomain.net.au", you will also need to ensure that these records are set up on VPS/Dedicated server in question.

Step 5 - Contact your domain registrar and set up glue records for your Nameservers. If the domain is registered with us, follow this guide. This only has to be done for the domain that you're using to create the Nameservers. In our example, this would be "yourdomain.net.au".
Once the Glue records are created, they can take between 4hrs and 24hrs to fully
propagate globally. Once those records have propagated, you can start using these Nameservers with your clients' hosting. We have a guide on changing Nameservers
here.
Set up Private Nameservers in VPS [Managed] Products
Note: You will need to log in as root to perform the steps below. You can follow our guide here to get your root logins.
If you don't want to access your VPS as root, please submit a support ticket with the required Nameservers and IPs and we can perform these steps for you.
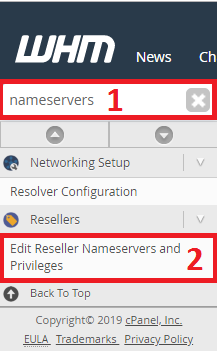
Step 1 - In the search bar (1) search Nameservers and click on (2) Edit Reseller Nameservers and Privileges.
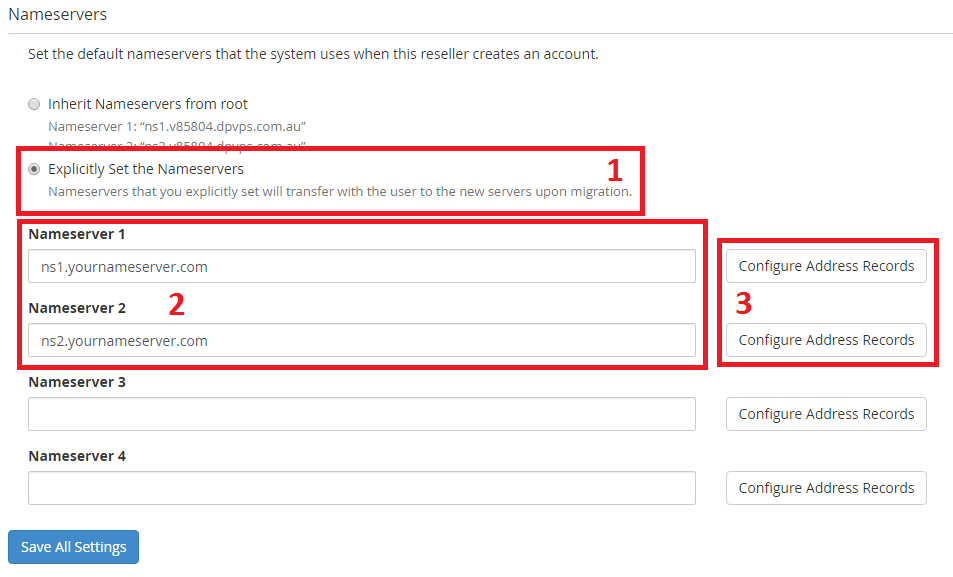
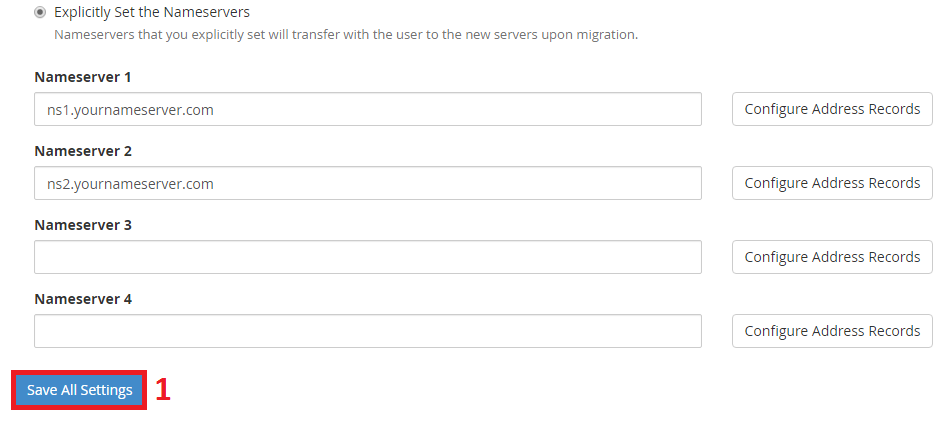
Step 2 - Scroll the the bottom of the page and select (1) Explicitly Set the Nameservers. (2) Enter in your new Nameservers in each respective field. (3) Click on Configure Address Records to set the IP address of each Nameserver.
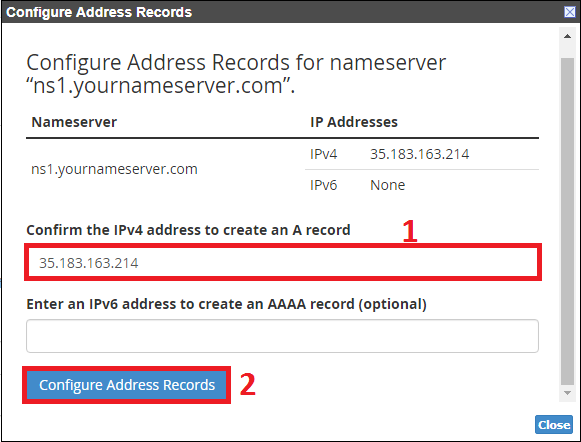
Step 3 - For each Configure Address Records option a popup will appear. (1) Enter the IP address of your server, then (2) click on Configure Address Records.
Step 4 - Click on (1) Save All Settings.
Step 5 - Log into the DNS management area for your domain. Create A records as below, replacing "yourdomain.net.au" with your domain name. You can find a guide on adding A records here.
Note: If you later change the Nameservers of "yourdomain.net.au" to "ns1.yourdomain.net.au" and "ns2.yourdomain.net.au", you will also need to ensure that these records are set up on VPS/Dedicated server in question.

Step 6 - Contact your domain registrar and set up glue records for your Nameservers. If the domain is registered with us, follow this guide. This step only has to be done for the domain that you're using to create the Nameservers. In our example, this would be "yourdomain.net.au".
Once the Glue records are created, they can take between 4hrs and 24hrs to fully
propagate globally. Once those records have propagated, you can start using these Nameservers with your clients' hosting. We have a guide on changing Nameservers
here.


