How to get Spam Reports from SpamExperts


Step 1 - Log into cPanel and click on Professional Spam Filter under Email.

112cd6d6b745ad4d271caf3043e269fb6d7f9498e058bd10245b29a308b5a70eebd838b146766010?t=dc0104e708fbe166a147c93a776bc887


Step 2 - Choose the domain or subdomain you want to access the spam settings for, then click Login.

65e3b43ffa27817f595d735d1ad5f808563c3bbcf9807d814f43f52b8e2671e1848c7bee1ac49365?t=871f50d4a9299bcf5ecb96f10f1ffcc2


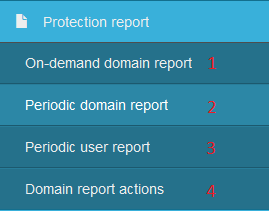
Step 3 - Scroll down until you see the Periodic Report section. You have 4 options here:

spamxreportpic01.png


1. On Demand domain report - This will generate a list of emails caught by the spam filter for the whole domain for a specific date range.
2. Periodic domain report - This will automatically email you a list of the mail caught by spam experts every day/week/month.
3. Periodic user report - This will generate a list of spam sent to a specific email address.
4. Domain report actions - This will allow you to chose whether the options Release, Release and Train, Whitelist and Release, and Blacklist and Remove are available from links inside the domain report. You can find explanations of these by clicking here to check our Quarantine guide.


Step 4 - While options 1-3 are similar, the most important and useful of the above options is the Periodic domain report. Click on that option.

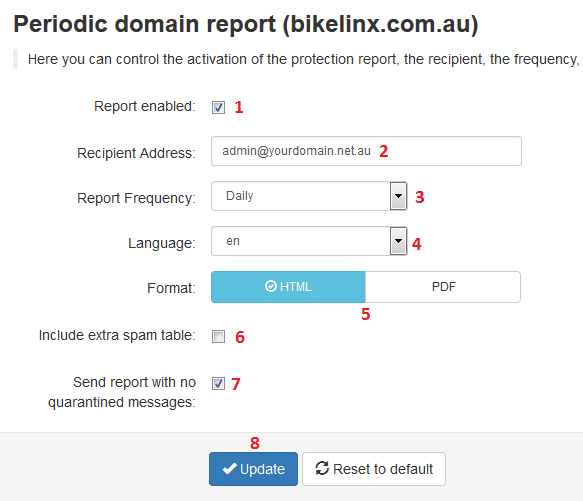
spamxquarpic02.png


Step 5 - Click on each of the options in the above picture to set up and enable reporting.

1 - Click Report enabled to turn on reporting.
2 - Choose the recipient of the report. This can be any email address at all, and doesn't have to be associated with the hosting account.
3 - Select whether you want the reporting to be Daily or Weekly.
4 - Choose the language you want the emails sent in.
5 - Choose whether you want the report to be sent in HTML or PDF. Generally, HTML will be easier to read.
6 - Choose whether to report on emails that were deleted automatically as well.
7 - Confirm whether a report should be sent even if there are 0 emails in quarantine at the time.
8 - Click Update once done.


Did you find this article useful?